furniture

How to preserve your Art

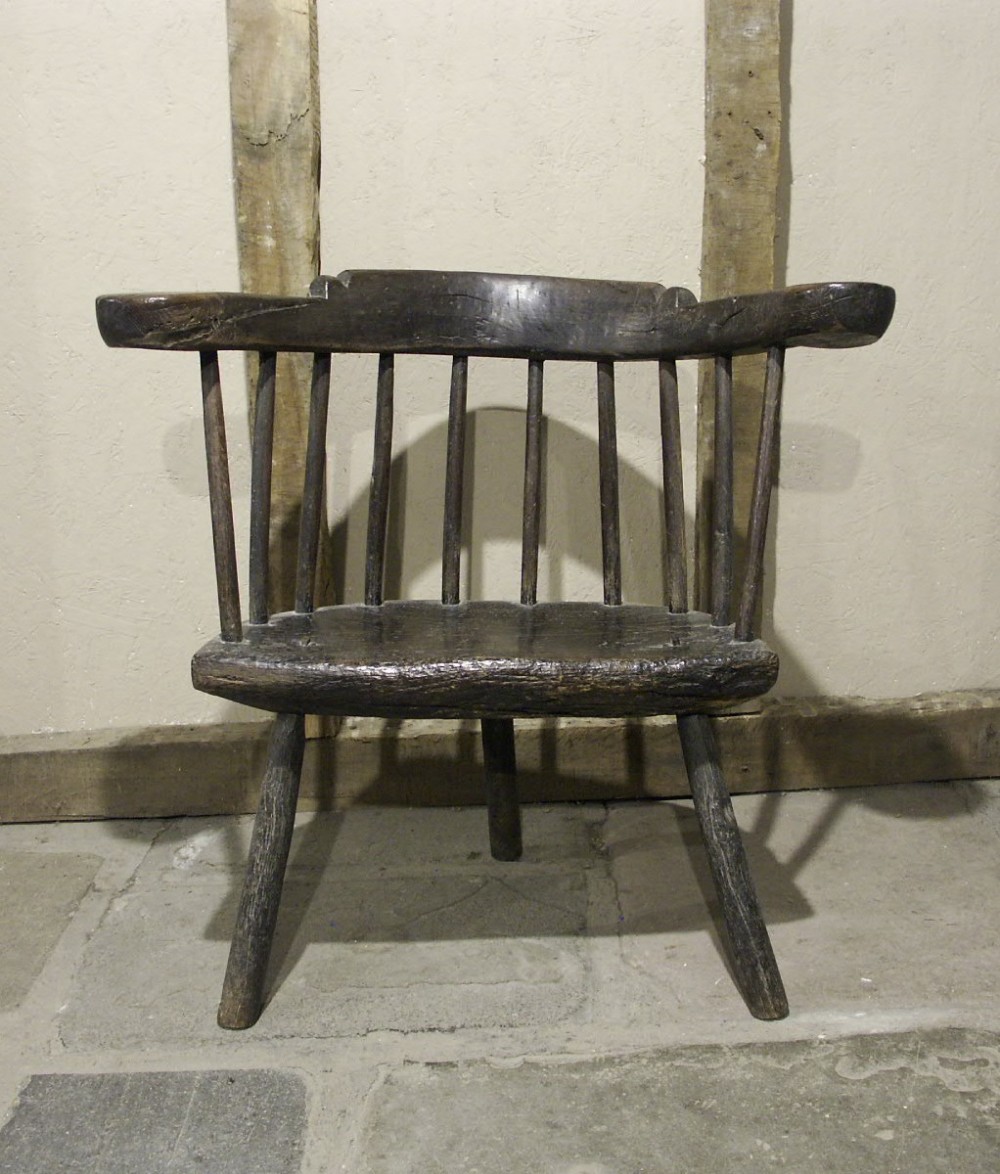
Only a fraction of all art that was ever created survives to this day. Naturally, large structures or images in stone have a better chance at survival. It is very hard to preserve wooden items for extended amounts of time, as they deteriorate rapidly unless kept in a well protected environment.

If a wooden sculpture is left outside it will most likely be destroyed by the elements after not too long. Attacked by fungi and bugs, battered by sun, rain and perhaps snow… there is little chance of its survival.

In contrast, some art has survived for hundreds or even thousands of years without much human maintenance.

The caves of Lascaux are the oldest example of graffiti/wall art (around 17,000 years old) and still exist because of the unique preserving environment of the caves. In comparison, the oldest pyramid in Egypt is ‘only’ approximately 4600 years old.

The oldest pyramid, build approximately 2630 BCE

Many structures that survive to this day originally had a function of a monument, tomb, grave or burial site.
They are preserved because they were built very solidly, and partially because of certain climate factors that functioned as preserving agents.

A chair can only survive if it is protected from the elements and/or people looking for firewood

To preserve your art depends in a great deal on how you see your art. If you want a tangible piece of art to survive, you could create a solid (religious) structure and decorate it with your art. Build this structure in a protective environment, far away from sea levels that can rise, arctic ice that can cover it, hurricanes or tornadoes that can destroy it. Maybe your creation will survive for a while (but you can’t ever say for sure).

I think there is a better way to do it, even though it erases your ego from the equation:

Teach your art.

Your legacy can live on for much longer than any tangible object that you made. People won’t necessarily name you as their inspiration in 300 or 3000 years but the inception of the idea ultimately has its roots in you.

The art that was given from generation to generation by inspiring people throughout history is where  preservation happens. Don’t rely on a museum to value your art and preserve it, take it into your own hands.

Teach your art rather than trying to preserve tangible things that will deteriorate once you stop being around to protect them.

-Rudy Everts

sculpture

A Wood Relief Carving of a Workshop

I purchased a relief carving on Ebay a little while ago. It depicts two people in a workshop sawing a log. There was no further information about the carving, its age, or where it was made. I asked Suzanne Ellison per the recommendation of Christopher Schwarz to see if she perhaps could tell me more about it. She wrote back with some very interesting information, analyzing the carving and providing a wealth of information. I wanted to share this information with you in a blog post.


I bought this carving on German Ebay, which initially made me think the carving was probably German. I searched for other relief carvings and came across a few more depicting a similar scene. Some were so similar to the one I bought that it has made me think it may be based on a famous carving or painting. Most other carvings I found originated in Spain, so I assume my carving may actually be Spanish as well.

One thing that is pretty typical for scenes involving a woodworking workshop is that it might be a religious carving and depicting Jesus and St. Joseph. After all, Jesus was a carpenter (and so was his dad).

I came across this carving that looks quite similar to the one I purchased
In a more crude style but very similar to my carving

The arrangement of the figures in the carving most closely resembles a painting of the Holy Family by Juan del Castillo (“La Segrada Familia” by Juan del Castillo, 1634-1636. From the Museum of Fine Arts Sevilla.).

Little Christ is not trying to saw a log in half, which it looks like at first glance. It is more likely he is shaping a tenon together with his dad, Joseph.

Whilst many woodworkers are going to look at the accuracy of the tools, the action, body position, Suzanne looked at the whole composition and not just the woodworking component. Another image that closely resembles the carving is the below image of a Spanish fresco, possibly 16th century, which appears to be illustrating the “board stretching” ability of young Jesus as written in an apocryphal gospel.

It has a nice wonky bench as well:

Who are the people in the carving?

Are the people in the carving St. Joseph and Jesus? How do we know if we are looking at a religious or secular painting? St. Joseph can be identified by the trio of the Holy Family, with the trio often painted in a triangular composition (a human trinity). Mary is usually sewing or spinning, Jesus (when not held by a parent or in a cradle) is collecting wood shavings, sweeping or woodworking with or without Joseph.

Most of the time Joseph is woodworking. When Joseph is shown only with Jesus the give-aways are halos, biblical-era robes and the locations of the paintings (cathedrals, chapels, shines). When Joseph is alone he can be identified by one or more of his symbols: carpentry tools, a staff with white lilies or the star of David. Halos, biblical robes and the location of the image in a religious building also help. 

The carving satisfies the carpentry tool requirement and there is a man and a youth working together. Another element to consider is the arch. This is a common architectural feature of churches and monasteries. An arch draws the eye upward. They are entrances that lead to the high ceiling of the nave.

In each of the three images above an arch is used in symbolic ways. In Castillo’s painting (left) the arch encloses and protects the human trinity. In the old Spanish fresco (right) the outline of the arch moves from Mary to Joseph, emphasizing they are the parents and protectors of Jesus, as well as, forming a frame of the human trinity. In my carving (middle) we see something similar. The saw is held by the man on one end and the youth on the other end, and with the arch positioned between the two figures, it flows from one end of the saw to the other. Both the saw and the arch join the two figures.

The youth also looks to the adult, which is another connection.

The clothing of the figures in the carving doesn’t appear to be significant. Not all paintings of St. Joseph and Jesus are in biblical-type robes. Very often the clothing was contemporary to the era in which it was painted. There are knee britches, long-sleeved shirts with vests, long pants and all kinds of hats.

Notice the tiled floor with its two different color tones

The foreground of the carving is interesting. The carver has placed the figures in the center with the space at the top a bit bigger than the floor space. What do you do with empty space? You can irritate Chris Schwarz and throw some tools all over or you can make the floor area more interesting and fill it with a pattern. The floor could have been carved to be a monotone stone floor, but your carver made a checkerboard floor. It adds depth and dimension and interest to the carving. 

Does the checkerboard floor have a meaning? One symbolic meaning is from Freemasonry and that is the Temple of King Solomon had a checkerboard floor. The aim of Freemasonry is to make better men out of good men which would include being better fathers. Was the carver of this piece a Mason? If he was a Mason and German, and the carver made this work 80-100 years ago, he would have had to be very careful about using Freemasonry symbols. If he was Catholic, or one of several other religions, he would not be a Mason or used their symbols. The checkerboard floor was therefore probably done to fill the lower space with an interesting pattern that did not detract from the central figures.

The carving could have been made to hang in the carver’s home as a religious plaque honoring St. Joseph and Jesus. If it is an entirely secular work it is a carving of a father and son or a master and apprentice, and the arch and the checkerboard floor are meant to fill in the empty spaces.

One particular misericord might be of interest, it is highly doubtful this was an attempt to depict St. Joseph & Jesus:

This is from the Index of Christian Art held by Princeton University. The carving is from a church in Baden-Baden. The Index identifies the church as St. Christopher’s, but that may be incorrect, and it doesn’t have a date. It might be 16th or 17th century and it looks to be from a wall panel and not a misericord. It doesn’t represent any of the known religious fables usually seen in misericords,  it is not overtly religious and so is listed as “occupational.”

It has the tools of a carpenter and the man is working with a youth and the carving is in a church. Was this meant to be St. Joseph and Jesus? Or, is it one of the many scenes of woodworkers done by the carvers working for years on misericords, choir panels and other decorative pieces in a church or cathedral? It was a way to commemorate their work and, in this case, inject some humor into the scene.

Perhaps the carver is commemorating the carpenters, or a particular carpenter, that worked to make and install the panels and took license to poking fun at them and their insistence on precise measurements. I particularly like how the youth-son-apprentice is a mini-me of the adult. Same thick, ear-length hair sticking out from under the round flat-top hat and both staring out at the viewer instead of watching exactly where that saw is going. The shield on the bottom may be for a guild or the sponsor paying for the work.

Side note: that type of hat is still made and worn. In America the hats are called dockers and were traditionally worn by longshoremen. 

Where does the carving originate?

While Suzanne was researching workbenches for Ingenious Mechanicks, it was artwork from Spain and the Spanish New World colonies that broke open a huge amount of information for the book.

The imagery used in religious paintings, especially those made to hang in a church, was for the benefit of illiterate parishioners. They saw the symbols and understood who was depicted in the painting and what part of the story of the life of Jesus, or a saint, was being told.

The relief is quite deep, as you can see from the side

This carving is not overtly religious but still has echoes of artwork that does represent Joseph and Jesus. The way the arch is positioned is important. It isn’t framing the top of the carving as was done in Castillo’s painting. At first look it is a background feature, second look and it joins the two figures.
As for the checkerboard floor the second photo of this scene says the most. It fills the foreground while not detracting from the figures and adds perspective. Along with the arch and small window, the floor completes the  picture of the two figures working in a shop or room. They aren’t just hanging in space. And we can leave out any references to Freemasonry! 

It is likely that the carving originates in Spain and depicts a holy scene of the Holy Father and Son in the carpentry workshop. Though the carving is not overly religious, it is the most likely explanation of the choice of figures and their placement.

Many thanks to Suzanne for this wealth of information!

-Rudy Everts

sculpture

Carving An Edelweiss Flower

I learned how to carve Edelweiss flowers during the last lockdown and wanted to share with you how to make one. If you feel bored at home right now, please read on. If not, please read on as well.


The best thing about this project is that you only need one tool: a knife with a straight blade. If you don’t have one, I can recommend the Mora 122 or the two cherries tools (Kirschen) straight blade knife (Rosenmesser) 3358 or 3363. My preference lies with the two cherries tools knife because the blade is thinner than the Mora 122 knife but all work fine.

Any straight blade knife will do the trick.

Selecting a suitable piece of wood

I recommend using dried wood as opposed to green wood. If you use green wood, you will likely have to re-carve at least part of the flower after it dries. As the billets used for these flowers are so thin, drying them takes little time. 

Little blank of (probably) poplar

Not all wood types are suitable for carving a flower. You will need a wood type that carves easily and is bendable to a certain extent. I have successfully used birch, linden (basswood/limewood), poplar, hazel and I am sure there are many more.

You will need a blank of approximately 3/8”/1cm in diameter. There are no precise dimension requirements. A stick from the garden will work too.

Make the stick round

The first step in making the flower is to make the billet round, don’t worry about making it perfectly round.

Once the billet is round-ish you can start working on the petals. Start the first cut about 1″/2.5 cm from the end. Cut about 1″/2,5 cm down and bend it back.

First cut of petal

The next cut is started right next to the first and the process is continued all around the stick until you reach the place where you started.

The inner petals are cut right between the outer leafs and are about half the length of the outer ones.

Carve all the way around the billet until you reach the other side again, bending back each petal as you progress.

Shaping the petals

The petals look nice when they have a pointy tip. Shape each outer and inner petal until you are happy with how they look.

Starting to make the petals pointy

Carving the blossom

Make small deep cuts above the petals you just made. They should be only 3/16″/0,5 cm deep and at a steeper angle. Make sure to hold the carving under the petals and not right next to where you cut, as it is very easy to end up with your knife in your finger (ask me how I know this).

Go all around the billet until you reach the other side again. Now grab the top part of your carving and break it off. If it doesn’t break off, carve some more stopping cuts like the ones above and try again.

Work on the stem

You can make the stem as thin or thick as you want. In my opinion a thinner stem looks better. 

Start by making a deep cut about 3/16″/0.5cm under the flower and split the wood below it.

Splitting the waste off is the fastest way

Splitting the wood is the fastest way to remove material but you can carve it away if you prefer this. Keep splitting the wood around the stem until you reach your desired thickness.

Make the leaves

The last step is making the leafs on the stem. The are made in a similar way to the leafs of the flower. Start the cut just below the flower, making sure not to go too deeply if you have a thin stem.

Start the cut of the first leaf just below the flower

Start the next leaf next to the first one but halfway above it, and carve until halfway below it.

Keep carving around the stem until you feel there are enough for your taste. I feel less is more but if you are having fun you can carve leafs around the whole stem.

Finished Edelweiss flower

I usually leave my Edelweiss flowers with no finish, though it could be a fun project to paint them when there are children around.

Have fun carving!

-Rudy Everts

Uncategorized

The No Knead Bread Recipe

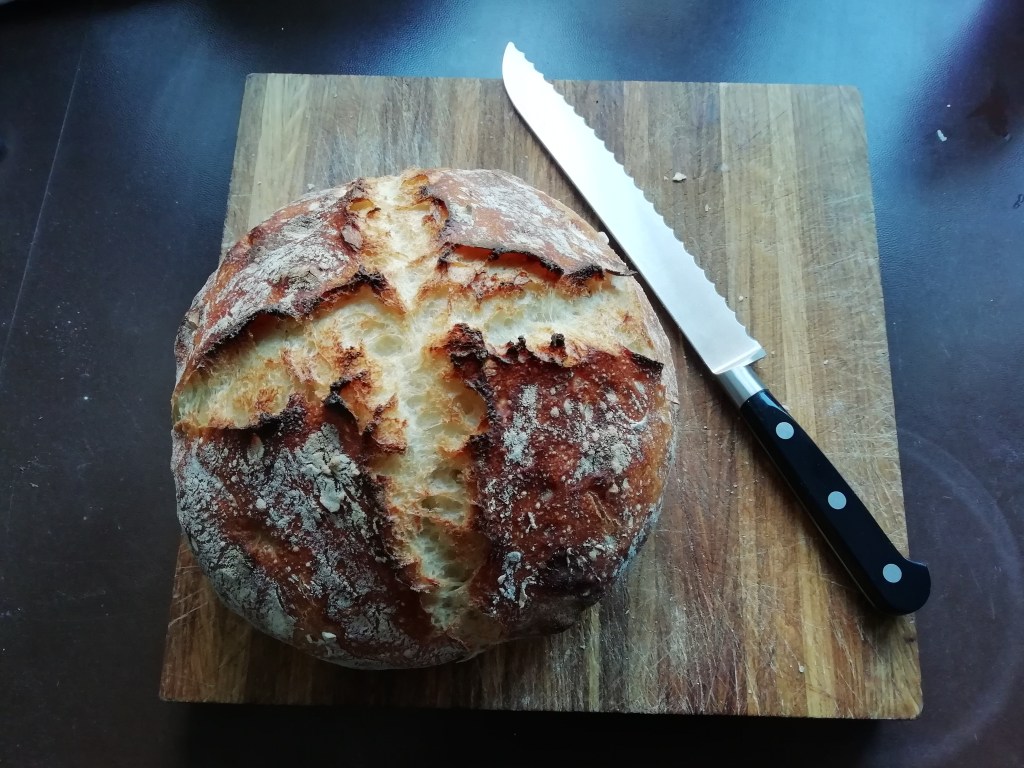
I know that this is mainly a woodworking blog but as several people have asked me about this bread recipe it seemed like a good idea to publish it here. The original recipe is from Claire Sutton and I have made it every day for many months now. It is by far the easiest way to make bread that I have tried and the bread tastes amazing.

wp-1606662271207.jpg

 
No Knead Bread
 
Ingredients imperial:
 
1 lbs all-purpose flour
1 tsp salt
2 cups lukewarm water
¼ tsp dried yeast or 1/5 oz fresh yeast
 
Ingredients metric:
 
400g all-purpose flour
1 teaspoon salt
350ml lukewarm water
6 grams fresh yeast (or ¼ teaspoon dried yeast)
 
You will need a heavy cast iron pan with a lid to bake the bread in, like a Le Creuset, with a diameter of 24cm / 9″”.
 
 
Day one
 
Mix the flour and salt in a bowl.
 
Let the yeast dissolve in the lukewarm water (about body temperature, not too hot and not too cold).
 
thumbnail-9.jpeg
 
Add this mixture to the flower in the bowl. Stir until it is a gooey lump of dough. Add some more flour if it is very runny but it does not have to resemble “normal” bread dough.
 
 
thumbnail-8.jpeg
 
Cover with a towel, cling film or a lid and set aside for 12+ hours. We usually make the bread dough at half past seven in the evening and bake it the next morning around 9am.
 
 
Day two
 
We usually proceed the next step around 7am the next day.
Sprinkle the dough mixture with some flour, then use a dough scraper to scrape the dough away from the sides, using more flour to stop it from sticking back to the bowl.
 
wp-1587629442149.jpg
 
Then shuffle it into a nice round shape by holding the bowl with both hands and circling it around. Cover again and leave for another 2 hours.
 
The bake
 
After rising the bread for 2 hours (or more if you forgot), put a heavy cast iron pan (lid on) in your oven and preheat on full power for 15 minutes.
 
Use the scraper and some flour to detach the dough from the bowl. Try not to puncture the air at this point.
 
After 15 minutes take the hot pan out of the oven with oven mittens and as quickly as you can tip the dough into the pan. If the dough sticks to the bowl use some more flour to detach it. Give a quick score to the top with a sharp knife (optional) and close the lid afterwards. Put back in the oven immediately. 
 
Depending on your oven, baking time may vary but we cook the bread for 27 minutes inside the pan and 2 minutes lid off for the final browning. Our oven’s thermostat broke some time ago so it never shuts off but heats and heats some more. This is actually an advantage for making this bread.
 
Make sure the bread is done by putting it upside down and tapping the bottom to see if it sounds hollow. If it doesn’t sound hollow, put it back into the oven without the cast iron pan for a bit longer. 
 
Cool well before cutting the bread, and resist the temptation to do this too early.

The finished bread, double scored in this case
furniture

The IKEA Plane Adjustment Hammer™

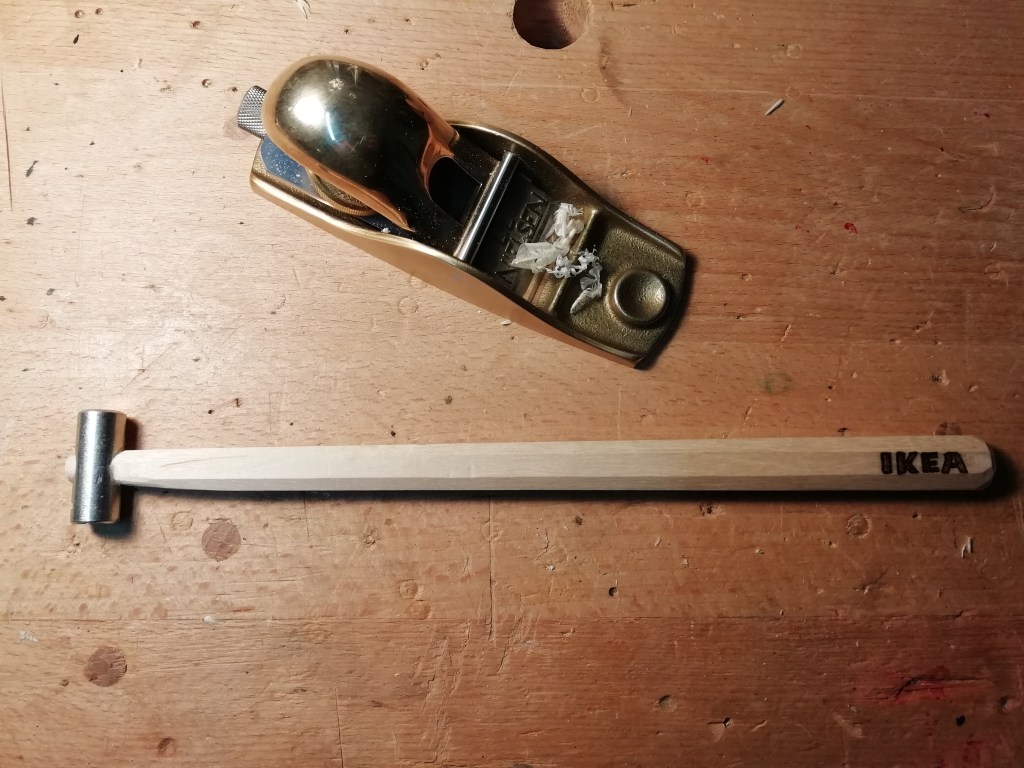
Did you know that many pieces of furniture you can buy at IKEA come with a Plane Adjustment Hammer™?

If you didn’t know this, please read on.


The IKEA Plane Adjustment Hammer™ is usually found in the see-through bag of hardware that comes with your piece of furniture. The only thing you have to do is make a handle for it. If you have (old) furniture from IKEA that has fallen apart, it is still possible to salvage several plane adjustment hammer heads from it. You just have to know where to look.

This is the hammer head we are looking for:

Standard IKEA Plane Adjustment Hammer Head

Making the handle

Start by selecting a suitable piece of hardwood that has straight grain (grain running straight through the piece from front to back). I used a small offcut of birch. You can use pretty much any wood that is straight, like ash, oak, or hickory.

I started with a piece of wood about 11″ long

It is not really that important what shape you make the handle, as long as it lies comfortably in your hand. I like to taper the handle so it is a bit thicker at the end to balance the hammer head but it is entirely up to you. In my example I made the hande using a handplane but you can also use a drawknife, spokeshave or pocket knife to shape the handle. Using a handplane will however give you the best results.

Notice the slight taper on the handle

I tapered the handle and chamfered the edges, making it roughly octagonal.

Shaping the tenon

Once you have shaped the handle it is time to make the tenon that will fit in the hammer head. You can use a pocket knife for this, or a dowel plate. If you have a lathe you could turn the tenon on there. The tenon should be about 7mm / a little over 1/4″ in diameter.

Using my dowel plate to make the tenon
Removing the waste and making a tenon shoulder

Once you have shaped the tenon, do a test fit to see that everything lines up. It should be a pretty tight fit. If things don’t line up because you messed up the tenon, just saw it off and start a new one (the hammer can be as long or short as you want).

Note the thread after screwing the hammer head onto the tenon

Interesting note: IKEA Plane Adjustment Hammer heads are threaded on the inside. This is a pretty brilliant Swedish invention, as the wedge will push the sides of the tenon into the thread making the joint nice and strong.

Turn the head clockwise to thread it onto the handle. To remove the head, turn the head counterclockwise.

Make a small wedge

When you are happy with the dry fit, make a wedge roughly the width of the tenon, preferably out of oak. Making a small wedge is difficult so what I do is make a normal sized wedge and split it to the correct width.

Wedge done and ready to be split to size

You can keep the offset and use it for a future plane adjustment hammer.

A spare wedge for a future hammer

This is how I make my wedges: with a chisel and a block in my vise.

Glue it up

With the wedge done, put the handle in a vice and saw a small kerf for the wedge. Next, add some white glue to the tenon and thread the head onto the handle. Line the head up with the handle, paint some glue on the wedge and hammer it home.

Glued up and wedged

Let it dry overnight and cut off the excess in front of the head, leaving it a little proud in case you need to make adjustments later.

Cutting off the excess the next day
The finished hammer. Please note this post was not sponsored by IKEA.

Oil the handle and pat yourself on the back. Make these for your woodworker friends and give them away to other people who might want them. They make excellent Christmas or birthday presents. Woodburning an IKEA logo on the handle is of course optional.

-Rudy Everts

furniture

The Anarchist’s Tool Chest: Making The Carving.

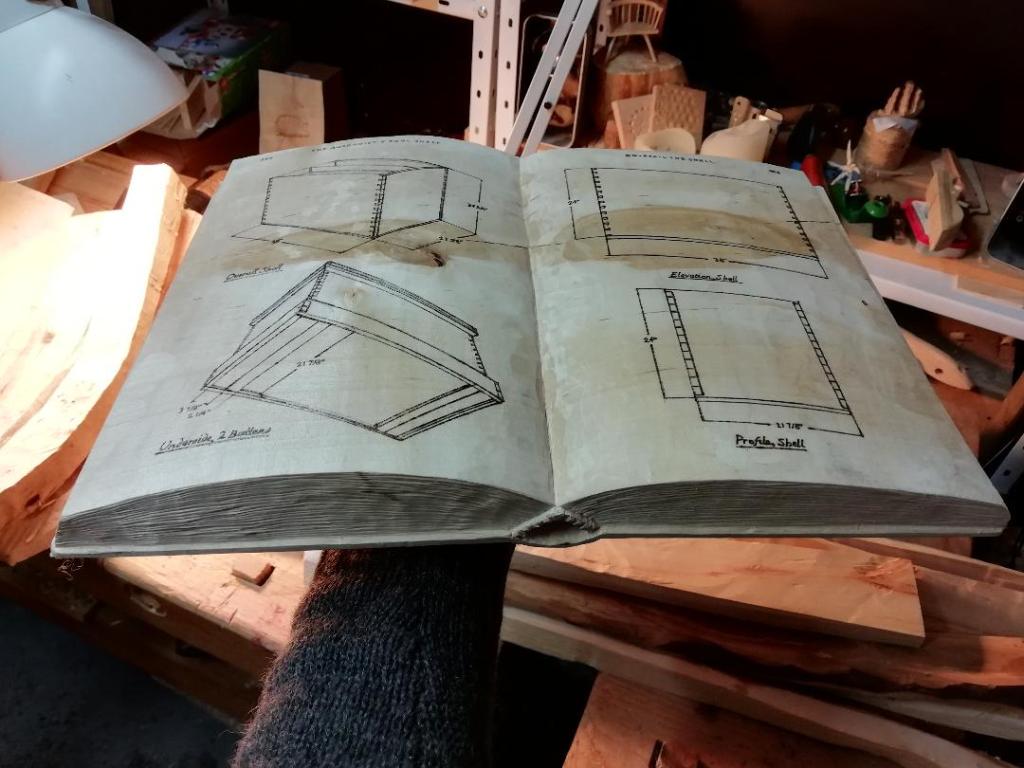
I carved a book for the 10-year anniversary of the Anarchist’s Tool Chest, published by Lost Art Press. In this blog post I show you how I made the carving.


The idea that lies at the origins of this carving goes back many years ago when I had the inspiration to carve a book. Combining my love for books and my love for woodworking into carving a book seemed like a great project. But I abandoned it at the time because I had no particular book I wanted to carve.

In the last few weeks the idea crept up on me again, possibly subconsciously influenced by a blog entry on Lost Art Press announcing the upcoming 10 year year anniversary of the Anarchist’s Tool Chest.

I found a small note on my workbench a couple of weeks ago, on which I had hastily scribbled ‘carve anarchist tool chest’. Not remembering having written this down, I must have been in a rush on my way to a crying kid or a burning pizza in the oven.

Coming across the note again made it all click, carve a solid wood Anarchist’s Tool Chest book. Good idea.

I had been carving some relief carvings lately and the English Square that adorns the front of the book (the big ‘A’) would be an excellent subject to carve.

In relief carving you have the choice to make the carving above or below the surface of the wood. I sketched the two possibilities to see which one would look better. The front of the original book has the Square set below the surface. After sketching both, I decided that the one set above the surface looked better – almost as if there was a real English Square glued on there.

Sketch – carved below surface
Sketch – carved above surface

I started by laying out the general shape of the book onto a piece of birch wood and made the first saw cut, right through the middle, followed by adzing out the waste. I smoothed things out with a wide chisel and sloped the edges down.

Using the real book as an example, it was easy enough to get the general shape to be convincing.

First cut roughed out, using saw and adze

The things to carve on the backside of the book were the spine and the front cover with the English Square. I sawed two notches next to the spine and adzed out the waste around them until getting the desired shape.

Back carving done

I smoothed it out with a wide chisel, carved the big ‘A’ on the cover and turned the book around to look at it.

This is an open book

Something was missing, it was too empty. But what to add to the middle pages? I initially had planned to print out two pages of the book and glue them to the carving but I abandoned that idea fairly quickly. The book is filled with a lot of text and images, hard to carve these…

Relief carving a tool chest on the left page crossed my mind (I might still do that one day).

When I browsed the book a bit more I remembered the beautiful technical drawings near the end of the book. I have always loved the simple lines and stark contrast between the black ink and the white paper. Could I somehow woodburn these drawings onto my carving?

Such nice drawings

I printed out all the pages of the book that had technical drawings and, together with my wife, picked out the ones we thought would look the best. We both picked page 404/405.

Drawings traced onto the wood using carbon paper

I used carbon paper to trace the drawings onto the wood, using a bendable ruler. After this I fired up my woodburner and used a metal ruler as a guide to get straight and even lines.

The result looks much better than I had anticipated. I love how the black burnt parts look striking and contrast nicely with the birch wood.

The back spine needed the author/title and the Lost Art Press logo which I considered carving out at first but I decided to woodburn these as well. The result is more readable than carving out the letters would have been.

I added some final details to the book: I used the iron of a toothing plane to simulate the pages in the end grain and used a tiny v-tool to imitate the pages on the sides of the book. I carved the binding of the pages as well. These are subtle details that you won’t see at first glance but them being there adds something to the overall appearance of the carving.

All in all this was one of the most fun projects I have completed. It combined many of the things I learned in my woodworking journey so far into one project.

-Rudy Everts

chairs, furniture

Chester Cornett: Retracing the methods of his cursive letter carving

One of the more peculiar things about some chairs by Chester Cornett is the cursive letter carving that he sometimes decorated his works with. The big rocking chair he made for president Nixon in 1973 has every back slat covered in cursive writing (Chester’s handwriting – but then carved).

Rocking chair Chester Cornett gave to president Nixon in 1973 

At some point recently it occurred to me that it is actually very hard to carve cursive words in wood. Getting constant flowing curves and constant depth is also quite a challenge in cursive. Though initially I thought that cursive carving is more forgiving than normal “Roman” carving, I actually think cursive is a lot harder to get right.

So why did Chester Cornett decide to carve cursive letters into his chairs? And what technique did he use? My theory is that it makes his chairs look personal, spontaneous and charming (and he may have thought so too). Plus when you start carving it gets addictive. It may be a mixture of both, in any case I get the feeling he carved primarily for himself and not to please his customers.

As for how he carved the letters, it is a mystery. I have scanned through many pictures of Cornett at work but have found none where he is carving. Normally, people use a set of carving gouges for letter carving. Since reliable sources indicate that no carving tools were found in Chester Cornett’s tool kit, the theory that he used a set of gouges is out. 

Cursive letter carvings on the bookcase rocker (1965-1966)

Another theory is that he used his general purpose knife (pocket) to do the carvings.

Chester Cornett using a knife to carve details into a rocker post

Studying some high resolution photos of his chairs, I could spot several small straight(ish) incisions.

Carving with a pocket knife would give you one flowing line and not these kinds of small stubs.

Carving into hardwoods with a pocket knife, you will end up really hurting your wrists. Chester Cornett did not use basswood for his chairs. Chester’s Nixon rocking chair from the top of this blog post for example was made out of sassafras.

My theory as to how he carved these is something completely different:

With a straight chisel and mallet.

Wooden mallet and 8mm (5/16″) wide straight chisel

The best way to test a theory is to try it out in practice. I carved some cursive letter carving into a piece of hard birch wood using one of Cornett’s examples (“Hand carved”). I carved it one time with a chisel and mallet and another time with a fixed blade (sloyd) knife, similar to Cornett’s knife in the above picture..

Carving the lettering with the sloyd knife was hard, irregular and potentially dangerous.

Carved with a Sloyd knife

Next, I used an 8mm single bevel chisel and a wooden mallet to carve the letters. Carving like this was, quite surprisingly, very easy.

Carved with a chisel and mallet

They don’t look all that different (though I think the chisel/mallet one looks superior) but with the chisel/mallet combination carving was a breeze compared to the life-threatening carving with the solid knife.

You wouldn’t think carving round shapes is possible or even easy with a straight chisel but it is. After all, you often use straight blades to shape the outsides of rounded objects in woodworking, like spoons or bowls.

We may never know the way he really did it, but I do believe that Chester Cornett carved his cursive lettering this way. It is fast, easy, and very fun – exactly what woodworking should be about. Carving into hard wood is not fun with a hand held knife, doesn’t produce good results easily and is not intuitive. Apart from that it is far more dangerous.

Having said that and having typed up this blog post, I decided to watch “hand carved” once again.

Chester Cornett is using a knife at around 49 minutes in to shape a tenon. It is not completely clear what knife it is because you only see part of it but I recognised it as a pruning knife, a folding knife used to harvest mushrooms or trim you garden plants. It has a slight downward curved edge at the tip that is similar to a chip carving knife.

I am going to try to order one of these knives online to see if I can carve cursive letters with this blade shape. It would still not explain the straight marks that are present on the larger letters in Cornett’s carvings though… 

To be continued!

-Rudy Everts

My trusty Chopin Block

handplanes, tools

To not restore a block plane

looks like a pretty nice vintage block plane, right?

I have had this block plane for about two years now after I bought it at a flea market (back when there still were flea markets… ).

In my workshop I initially avoided it because it needed some work before becoming operational. Yesterday I decided to have a go at it.  I though perhaps it would be useful as a rough “scrub” block plane, for roughing out chair legs.

The plane was in fair condition to begin with. Though it didn’t have much rust at all, it was in need of some work.

The block plane looks nice in a picture.

However (and I should have realised this from the beginning) the block plane itself was of very mediocre quality.

The 1.5mm thin blade had sharp edges at its back, making the plane painful to use:

Ouch, sharp edges!

I filed the corners round which made a minimal improvement.

Then I sharpened the blade to razor sharpness, only to find that the blade did not fit in the plane correctly. The lever cap presses down on the blade in the wrong spot, making the entire thing skewed.

Things don’t line up…

All I could think was, why would anyone ever manufacture such an crappy tool, and why did I just waste my precious time on it? It probably never worked correctly to begin with.

I know there are vintage quality tools out there worth restoring. But this certainly was not one of them. It’s a pity I don’t own a forge so I could at least melt it and blacksmith it into a large black C for Capitalism.

A typical example of a tool-shaped object, but vintage. Cost-cutting has been done for a long time, I was just surprised to see how low the quality of this vintage tool was.

Burn the witch!

At least I didn’t pay a lot of money for it. But I wasted time on it, which is in some way worse. Then yet I learned something and will make sure to never attempt restoring something not worth restoring…

-Rudy Everts

chairs, furniture, philisophy

This will outlive me

There has been much talk about furniture “outliving the maker”. And that chairs currently made could still being around in several hundreds years. A romantic view that has a nice soothing feeling for the egos of the makers currently alive. After all, what is better than feeling that your life was not in vain, your legacy still lives on, there is a tangible piece of “you” still in this world after you are gone.

images-1
A fine example of a chair that didn’t end up in the firewood pile

The view expressed has its basis in the repulsion of the current throwaway culture. When a store-bought chair doesn’t live as long as it should because it is not well-made, it is a waste of workmanship and resources. Even if the chair was cheap it is frustrating.

Many people who make their own furniture these days therefore feel a righteous feeling about the quality of the things they make. Though this is understandable, there is one hole in the argument:

The survival of your furniture does not solely depend on how well it was made.

People forget the possibility of future idiots owning their furniture after they are gone. Sure your spouse and/or children may find your work special and treasure it in their homes during the rest of their lives but what about when they are gone? At that point your work is in the hands of the world and will likely be judged upon its appearance more that on how “well made” it is. And they won’t care about it on the same personal level because they have never known you.

Sometimes it already ends sooner. The day after you die your spouse throws out that one chair they always hated. But at least the chair outlived you!

I am a strong advocate of making things as well as you can, using the best materials and techniques at your current disposal. But there also is a danger in design and fashion, two areas furniture has historically been very susceptible to. 

DtuNANtWsAE01D0
Will this chair be in style again? Is it currently in style?

The furniture you make has its roots in the current time. It doesn’t really matter what you build, it will at one point likely look dated. This means at one point your creations could (temporarily) end up in a damp cellar or a non-climate controlled barn or attic when they go out of fashion. So much for that strong staked leg joint when your chair is under attack by worms or termites..

But after that the chair will have that true antique-y look so it may become attractive again.

images-2
This chair has been in the barn long enough and finally looks like an antique.

The bottom line is, people need to care for your creation after you are gone, or the piece may not have the long life that you intended for it. 

How do you make people care for your furniture? It helps to give or sell your pieces to people who value them. Their ancestors or friends will likely have a similar mindset. There are many examples of Welsh Stick Chairs having been in a family for generations. And this is where the quality of materials and workmanship comes in again.

I do feel that it is remarkable that, to stay with the Welsh “peasants” that built Welsh Stick Chairs several hundreds of years ago, their pieces survived for this long even if the makers’ intention never was this.

The makers back then needed something to sit on and they made it the best they could. They never meant for the chairs to be around this long – why would that be their intention?

wp-1594990260802.jpg
My latest chair

Therefore I make my chairs for the here and the now, to be enjoyed by the people who sit in them and look at them. Not for the future.  I need a place to sit and I enjoy making chairs. That is enough for me.

I hope that when my chairs get burnt they will be providing warmth to a cosy home and hopefully accompany a nice philosophical conversation.

Rudy Everts

furniture, philisophy

Inspiration and the limitations of technique

IMG_20191104_222926_068.jpg

We all start somewhere. We all practice. We all have our reasons to practice.
When your technique improves, it helps you achieve your goals.

For instance, when you can play scales on the piano without errors, or saw to a saw line without going off to the side, it lays a good basis for successful creation.

Technical expertise comes in handy when you want to create something, be it learning a new piece on the piano, or building a Whiskey cabinet with 150 dovetails.

But what about inspiration? Maybe you started studying scales because you wanted to play the Chopin Polonaises on the piano. Maybe you wanted to learn how to carve wood because of an amazing sculpture you saw. Maybe you wanted to learn how to ride a bicycle because you saw people doing cool BMX tricks on TV as a kid.

If you don’t remember these original inspirations that drove you to go through all that effort, you may end up just practicing scales – but super-fast.
You may end up making sculptures in a traditional Southern-German style – because your sculpting teacher told you so.
Or you may end up just riding your boring city bike from point A to point B – without doing any BMX tricks at all.

And that would be a pity.

Notes

To avoid this loss of inspiration, I have made it a habit to write down any idea that comes to my mind. Not matter how silly, weird or impossible it seems. I don’t put pressure on myself except to outline the idea as clearly as possible.
I therefore have a big collection of paper notes, scribbles and drawings.

Sometimes I go through my notes and find an idea that was previously impossible to execute due to lacking technique, tools or knowledge but has now come into my reach due to my increased skills.

Carving

When I first started whittling wood with a pocket knife, around 2014, I had an idea for a sculpture. I wanted to carve a sail boat. Not a still model but a sail boat on the water leaning to the side in the wind, the sails bulging, waves around the bow. A very lively scene with lots of movement.
Somewhere later that year I attended a two-day woodcarving workshop and on the second day I pitched the idea to the teacher. I sketched the sculpture and he just stood there and grinned ‘’good luck buddy, that’s way too hard for you’’.

So I made a lizard instead on that day.

IMG_20190220_202246.jpg
Lizard sculpture

My technique and skills were obviously lacking at the time. But I did not forget the idea of the sail boat. Some months later, after much carving practice and making many sculptures, I decided to grab a piece of birch wood and came up with something that was close enough to the inspiration I originally had.

IMG_20191104_200342.jpg
Sail boat in wind, first try

I made many more of these in the months that followed, each one a little closer to the idea I had in my head.

I have piles and piles of sketches, ideas, drawings. A lot of them will probably never be executed. But I keep them around and go through them from time to time.

If anything, I can have a laugh at some silly ideas I had when I was younger.

-Rudy Everts