Part Two
Please click here for part one of my Welsh Stick Chair build
Let’s make some sticks
With the undercarriage done, I moved to the second level of the chair – the sticks and armbow/comb.
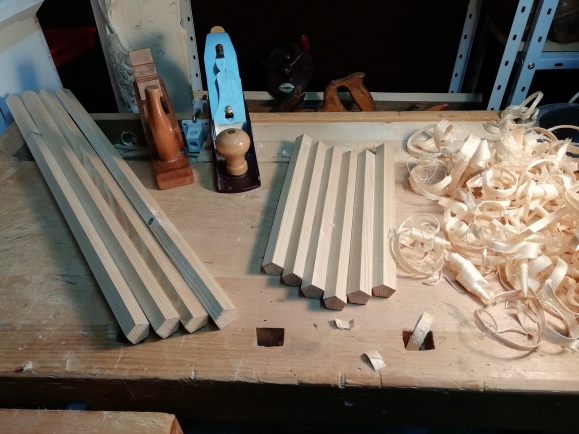
Shaping the sticks took a lot of time. I don’t have a straight tenon cutter so everything had to be done by hand. Experimenting with a dowel plate to make the tenons made it a bit easier but the bulk of the 26 tenons in this chair was made with my Slöjd knife. It worked fine but was a lot of work.


Test-fitting the tenons is best done in a separate piece of wood and not directly in the armbow, as I found out when my armbow snapped, right at the tenon. I glued the armbow together again and made a tenon-testing-block with a 15mm hole in it.
Drilling into the seat
Drilling the mortises for the sticks in the seat has to be done at the correct angle. How do you find the correct angle? By using a long spade bit that fits through the mortise in the armbow and extends all the way to the seat. You basically pretend that the drill bit is a stick. I started with the four long sticks in the back, after those were in drilling the six short sticks was easy.

For drilling the four long sticks I held the armbow in place with a jig that keeps the armbow 8” above the seat (jig is not in this picture).

The comb
With the chair now mostly done, the last thing to make was the comb.

I made the comb out of a piece of firewood (pine). First I marked the mortises using the long sticks and drilled them using a 15mm bit. Then I shaped the comb using a single bevel hatchet for the convex area and an adze for the concave part, followed by a draw knife and spokeshave.

Testing if all pieces fit together
With all the pieces done, it was time for a dry test-fit

Glue-up time
With the chair complete, I glued up the undercarriage and let it dry overnight. When hide glue is too cold, it reduces the opening time a lot. I found this out the hard way.
When I glued in one stretcher, the glue dried before I could adjust it. Trying to turn it anyway made the tenon snap. So I made a new stretcher and went ahead with the glue up. A stretcher is easy to make but the next time I will make sure my glue is hot enough.

The next day, I leveled the chair, trimmed the wedges, and glued up the sticks / armbow / comb.

Painting the chair
I decided to paint my chair with milk paint. Though I am a big fan of natural wood finishes, I wanted to paint this chair black over green. With time, the black paint will wear off and expose the green paint, making a nice contrast.

After the green paint was dry, I painted the chair black.


The next day, I sealed the chair with linseed oil, followed by some awesome wax I got from Brian Eve, who says he will start selling it soon (and he should).
The chair is very comfortable to sit in and I like the shiny glossy black finish a lot.
I hope you enjoyed my build, please feel free to leave I comment, I would love to hear from you.
-Rudy Everts

Hallo Rudy, das ist ein toller Stuhl geworden. Danke für den schönen Bericht! Ich gebe zu, mich würde es Überwindung kosten so viel Zeit mit der Bearbeitung von billigen Baumarktholz zu verbringen. Wenn der Stuhl einen Anstrich bekommt ist das aber ganz egal. Gefällt mir!
Gruß Volker
PS: Da du in München wohnst, gehe ich davon aus, dass mein Kommentar auf deutsch ok ist.
LikeLiked by 1 person
Hallo Volker,
Deutsch ist kein Probem 🙂 Vielen Dank für dein Kommentar! Baumarktholz ist sicherlich auch nicht mein erster Wahl – aber es hat trotzdem Spaß gemacht es mal zu benutzen um etwas schönes draus zu machen. Der nächste Stuhl wird dann wahrscheinlich aus Kirsch- und Birkenholz gemacht. Ein Pluspunkt von Baumarktholz ist aber dass es schön leicht ist, was bei einem Stuhl sicherlich vorteilhaft ist.
Nochmal danke für deine Nachricht, habe mich gefreut.
Gruß,
Rudy
LikeLiked by 1 person
Hallo Rudy,
die größten Bedenken bei dem schnell gewachsenen Baumarktholz wäre die Stabilität der Sitzfläche. Da hätte ich angst dass sie evtl. bricht, wenn man sich mit Schwung mal auf den Stuhl setzt. Mir ist das mal bei einem gekauften Stuhl aus Erle passiert.
Viele Grüße
Volker
LikeLiked by 1 person
Genau, ich hoffe, dies passiert nicht… die Platten sind 58mm stark also hoffentlich dick genug. Ich habe zwei kleine Kinder, der Stuhl wird momentan also ausführlich und ohne Rücksicht getestet 🙂
LikeLiked by 1 person
I bought a Domino because I can’t be bothered to chop regular mortises. You make them PENTAGONAL. Awesome job, Rudy.
LikeLiked by 1 person
Thanks Finn! I know, it was crazy to make those mortises, I hit myself in the head after I started the first one but there was no turning back then…
LikeLike
Congratulations, Rudy on a beautiful chair. Having been lucky enough to sit in it, I’d like to say it is also very comfortable. I’m not worried that your Baumarktholz isn’t good enough. There’s a lot of chairs out there made of materials inferior to that. In fact, it is extremely common to find Bavarian vernacular chairs with 19mm thick pine seats only with 19mm pine crossbattens recessed in them. I’m sure your chair is stronger than that!
Oh, and thanks for the shout out.
Cheers!
LikeLiked by 1 person
Thanks so much Brian! I agree that the 58mm thick wood will probably fine (though my son is trying his best to give the chair a thorough testing). I am always surprised about the large number of surviving vernacular chairs that used softwoods rather than hardwoods for the seat and/or legs. Maybe we are just being paranoid – time will tell whether this chair survives or not. If it doesn’t I will for sure post the event of burning it here on the blog.
Cheers!
LikeLiked by 1 person
Rudy,
Looks great, building stick chairs can be an obsession. My current build is Red Oak so it may be finished with oil and wax but I expect the next to have a milk paint finish. I like the black over green.
ken
LikeLike
Thanks a lot for your comment, Ken! I would be very interested to see your chair when you finish it. I think natutal finishes are very beautiful indeed
LikeLike